Servicing Scuba Regulators: A Comprehensive Guide
 Scuba diving regulators are essential pieces of equipment for divers, providing them with a reliable source of breathable air underwater. Regular servicing is crucial to ensure the life support, safety, and performance of these devices.
This article provides a comprehensive guide to servicing scuba regulators, covering the necessary tools, steps involved, and troubleshooting tips.
Tools Required:
- Regulator specific to the equipment, service kits
- Hex key sets (both metric and imperial)
- Screwdrivers of various sizes (Phillips and flathead)
- O-ring pick
- Various spanner sizes.
- Ultrasonic cleaner heated with Bio-Ox
- 02 Lubricant (regulator specific, oxygen
Steps Involved
Disassembly:
- Disconnect the regulator from the tank and pressure gauge.
- Remove the diaphragm and spring assembly.
- Remove the piston and spring assembly.
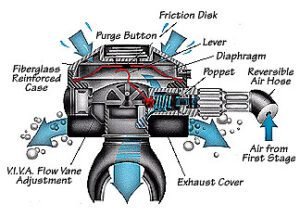
- Disassemble the second stage, including the mouthpiece, purge button, and exhaust valve.
Cleaning:
- Place all disassembled parts in an ultrasonic cleaner filled with a mild detergent solution.
- Run the ultrasonic cleaner at 50c for 10-15 minutes or as per the manufacturer’s instructions.
- Rinse all parts thoroughly with clean water.
Inspection:
- Carefully inspect all parts for any damage, corrosion, or wear.
- Replace any damaged or worn components using the correct service kit for your regulator.
- Check the O-rings for any cracks or deformation, and replace them if necessary.
Lubrication:
- Apply a thin layer of regulator-specific lubricant to all O-rings and moving parts.
- Avoid using petroleum-based lubricants as they can damage the regulator.
Reassembly:
- Reassemble the second stage first, ensuring that all components are properly aligned.
- Install the piston and spring assembly into the first stage.
- Place the diaphragm and spring assembly over the piston and secure it.
- Reconnect the regulator to the tank and pressure gauge.
Pressure Testing:
- Connect the regulator to a compressed air source and pressurize it to the manufacturer’s specifications.
- Check for any leaks using a soapy water solution.
- Adjust the intermediate pressure (IP) and second-stage opening pressure (SOP) as per the manufacturer’s instructions.
Troubleshooting Tips:
- Leaking regulator: Check for damaged or worn O-rings, loose connections, or a faulty diaphragm.
- Difficulty breathing: Check for blockages in the hoses, mouthpiece, or exhaust valve.
- Free-flowing regulator: Adjust the SOP or check for a damaged diaphragm or piston.
- Loud breathing noise: Check for a torn or damaged exhaust valve or a loose orifice.
- Erratic pressure readings: Check for a malfunctioning pressure gauge or a leak in the hose.
Frequency of Service:
- The frequency of servicing for scuba regulators depends on the usage and environment. As a general guideline:
- Recreational divers: Every 1-2 years
- Tech divers or frequent divers: Annually or as per the manufacturer’s recommendations
Conclusion:
Servicing scuba regulators is a crucial task for ensuring life support of diver safety and equipment reliability.
By following the steps outlined in this guide and using the appropriate tools, divers can perform regular servicing and maintain their regulators to optimal work conditions.
Regular servicing can help prevent equipment failures, extend the lifespan of the regulator, and provide peace of mind during underwater dives.
We recommend our ASSET Dive Industry Technicians Course to give you a good sound knowledge and competent person. This course will give you the confidence and expertise to rebuild and service your regulator properly and correctly.
WARNING !!! Only certified technicians who have attended recognised training courses should attempt to service a dive scuba equipment. Many diver deaths have been caused by amateur and incorrect servicing techniques. Get certified or Trained through ASSET Courses. ASSET Technician qualifications indicate that Technicians have received sound theoretical and practical training.


